
Lettera 32
The Water Holds Me

Unedited first draft. I love the typeface on this Lettera 32
Beach typing
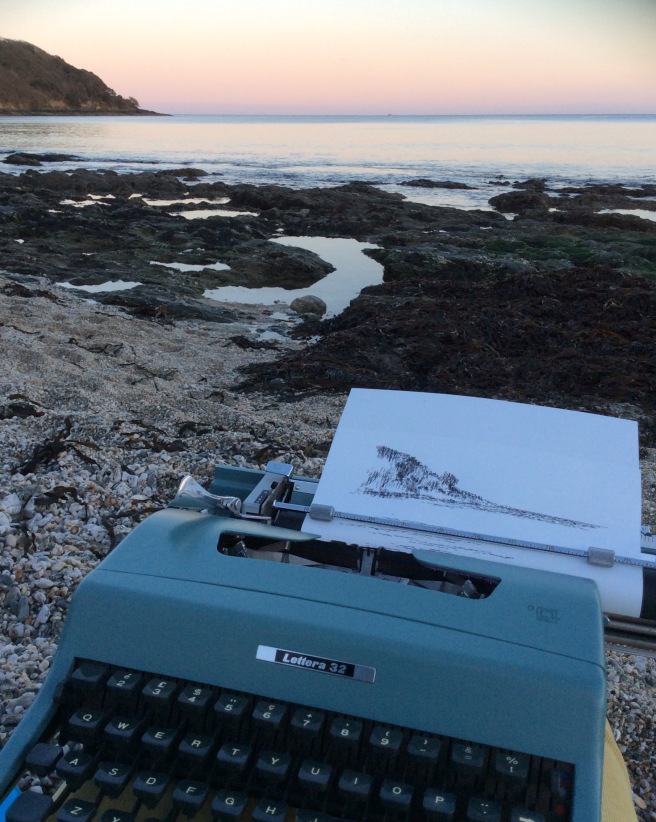
Sketching with the Lettera 32 at dusk.
Another case fixed
The case for my Spanish Lettera 32 was in a sorry state, with a hanging zip and a loose base inside. Not to mention filthy on the outside. A scrub with Cif and a sponge got it smelling nice before I started on the zip.


The holes from the broken stitches are still there, so make a good guide for the mending. I used a strong linen thread and a big fat sturdy needle. Ordinary sewing thread and needles will not be up to this. The best stitch to use on bags and cases is the shoe-stitch: do a running stitch, all the way to the end of the line and then turn back on yourself and fill in the gaps with another running stitch. (Back-stitch is messy and awkward!)

I was outside doing this fix because the next bit was very smelly. I’ve used Bostick Fast-Tack to successfully glue another case back together. Spray it on all over on both surfaces, wait a couple of minutes and then press together. It will bond in a few minutes or less depending on your surfaces.


It’s not the prettiest, but now it works fine, and smells a lot better. There’s no discernible odour from the glue.
Hello, Barcelona typer.
![]() I’ve been having some fun with another Lettera 32. This one was made in Spain.
I’ve been having some fun with another Lettera 32. This one was made in Spain.


I thought there might have been some grease, stopping adhesion, but it was as clean as I had thought I had made it. So I sanded the paint down to the metal to try for a better grip. I kept the original sugru in there, and added more, this time, up to where the screw should be. Before it set (you get 30 minutes’ play) I put the ribbon cover from the other Lettera 32 on to check clearance. It was fine, but I noticed the difference in paint textures.


The Naked Lettera
You know how it is on a Wednesday lunchtime, when your tiny bit of dust removal turns into a thing with screwdrivers. Here is what happened with my Lettera 22 and Lettera 32. A few days ago I was gnashing my teeth over how on earth to get the base (and body) off the Lettera 32. Thanks to Uwe on Typewriter Talk and to Tom Lucas The Typewriter Man (who also sold me some spiffing grommets for the Lettera 32 which have ended up on the 22 because it needed them more in the end) I finally got the 32 (and 22) naked. The simplicity of the 32’s base attachment foxed me. You literally lever it off with a screwdriver, and I should have been able to see that for myself. The evidence of others’ levering is there on the base where excessive force was used and the corners bent up slightly. But there I was, thinking, “Hmm, I wonder what blasted secret typewriter mechanic tool I need to get those bolts off.” (yes, I’m laughing now, too) Onwards.


Once this is done, you lift the back end up and the front end of this kind of base has two tabs that fit into slots and it all comes off. Simple! The lettera 22 has a more obvious 4 screws on feet on the base which even I could fathom.

I found that for some reason the Lettera 22 wanted its carriage extended to the left to get undressed.


 Just a cursory glance tells you the innards are quite different. But then I also noticed when cleaning the type basket that on the 32 I can depress the basket with my little finger. It is a jiggly joggly basket. On the 22 the basket is firm and unmovable until you engage the shift keys. The 32 has a twanging sound, thanks to the shift mechanism springs, while the 22 is solid and silent in comparison, even though the actual typing sound is slightly louder (on mine). Strangely, even though to me the 22 feels more solid in construction, it is actually about 0.4 kg lighter than the 32.
And I don’t fancy having to repair a drawcord on the 32, the 22 looks a lot more accessible. Hope I never have to!
The Lettera 32 had arrived in working order, but then it had developed a sudden zippy carriage and non-functioning escapement. This resolved itself in the process of trying to get the thing undressed, and I hope that my cleaning and sewing machine oiling will keep it from returning.
